Power Apps Code Apps
The fastest way to scaffold, deploy, and maintain an enterprise-grade Power Apps Code App — built with React, Fluent UI v9, and a planning-first coding-agent workflow. Use this template, run the wizard from VS Code, plan in plan mode, then build and deploy.
🗺️ Template to Production — in 10 Steps
From clicking Use this template on GitHub to promoting through Power Platform Pipelines, every Foundations team follows the same proven path. One picture says it all.
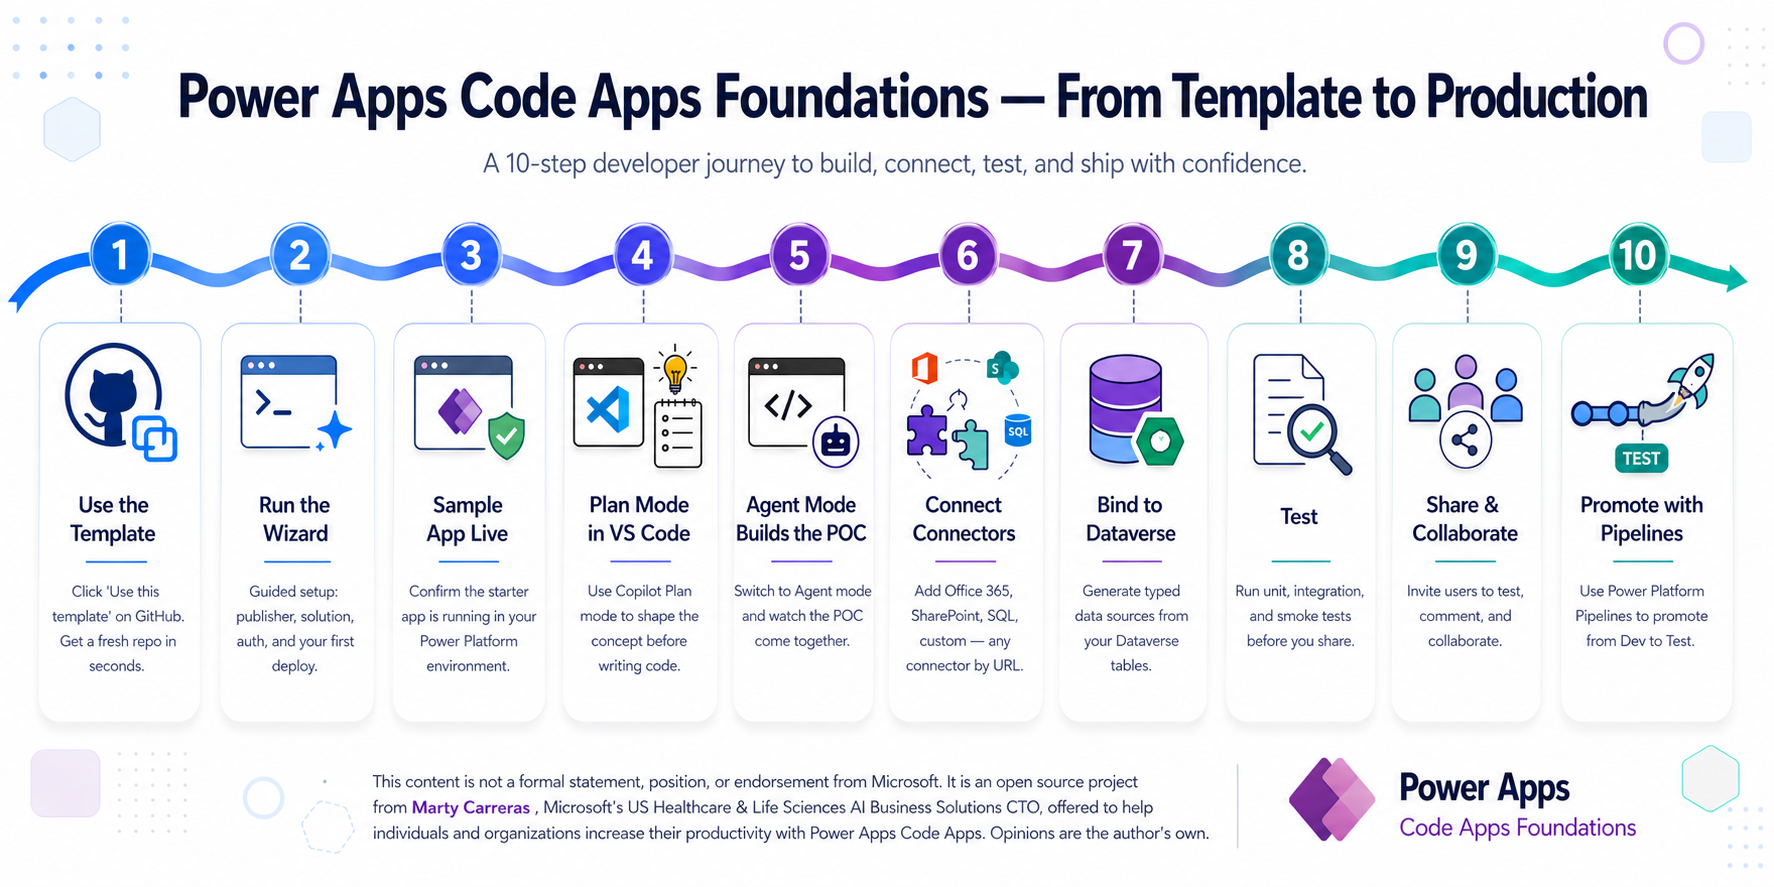
The rest of this guide explains how — section by section.
Start Here
The README and the Guide describe the same workflow. Pick the format that matches how you want to onboard.
Start in the README
Use the concise text version if you want the shortest path through cloning, running the wizard, and understanding the repo structure.
Stay in the Guide
Use this page if you want the same procedure with richer context, step breakdowns, portal links, and operational cautions in one place.
Need the Full Delivery Path?
Use the prototype-first golden path when you want the end-to-end sequence from business planning through schema hardening and real providers.
What's Inside
The Foundations are an npm-published toolchain. The template repo gives you a clean starting point; the heavy lifting lives in @pacaf/* packages and is invoked from your editor by an AI coding agent.
What you install from npm
Published packages under @pacaf/* drive setup, scaffolding, agent guidance, fork rebranding, and ongoing updates. End users never copy this tooling into their repo — they consume it as devDependencies.
@pacaf/wizard-ux— browser setup wizard@pacaf/scripts— 15pacaf-*helper CLIs@pacaf/agent-instructions— coding-agent guidance, synced into your repo@pacaf/rebrand— retarget a fork to your own npm scope
What you start with from the template
Clicking "Use this template" creates your own repo from PowerAppsCodeApp-Starter — a minimal, standalone starter (the contents of templates/starter/) so the wizard can fill in everything else. After the wizard runs, your repo contains src/, package.json, vite.config.ts, power.config.json, .github/instructions/, and the rest of a working Code App.
Foundations monorepo (this repo)
If you're going to fork or contribute, this is the layout you'll see. End users do not need to clone this repo.
Your derived repo after the wizard runs
The wizard writes a Code App scaffold into your repo. Tooling stays in npm; only the project code and synced instruction files live in your repo.
16 Instruction Files — 4 Agents
Native guidance for GitHub Copilot, Claude Code, Cursor, and Codex. Each agent reads the same rules in its own format. The canonical source lives in .github/instructions/; Claude, Cursor, and Codex projections are generated from it.
Narrative-First Planning
Optional but high-leverage. Instruction files 00a → 00d walk your coding agent through business decomposition, scope refinement, conceptual modeling, and prototype validation before schema and connectors harden.
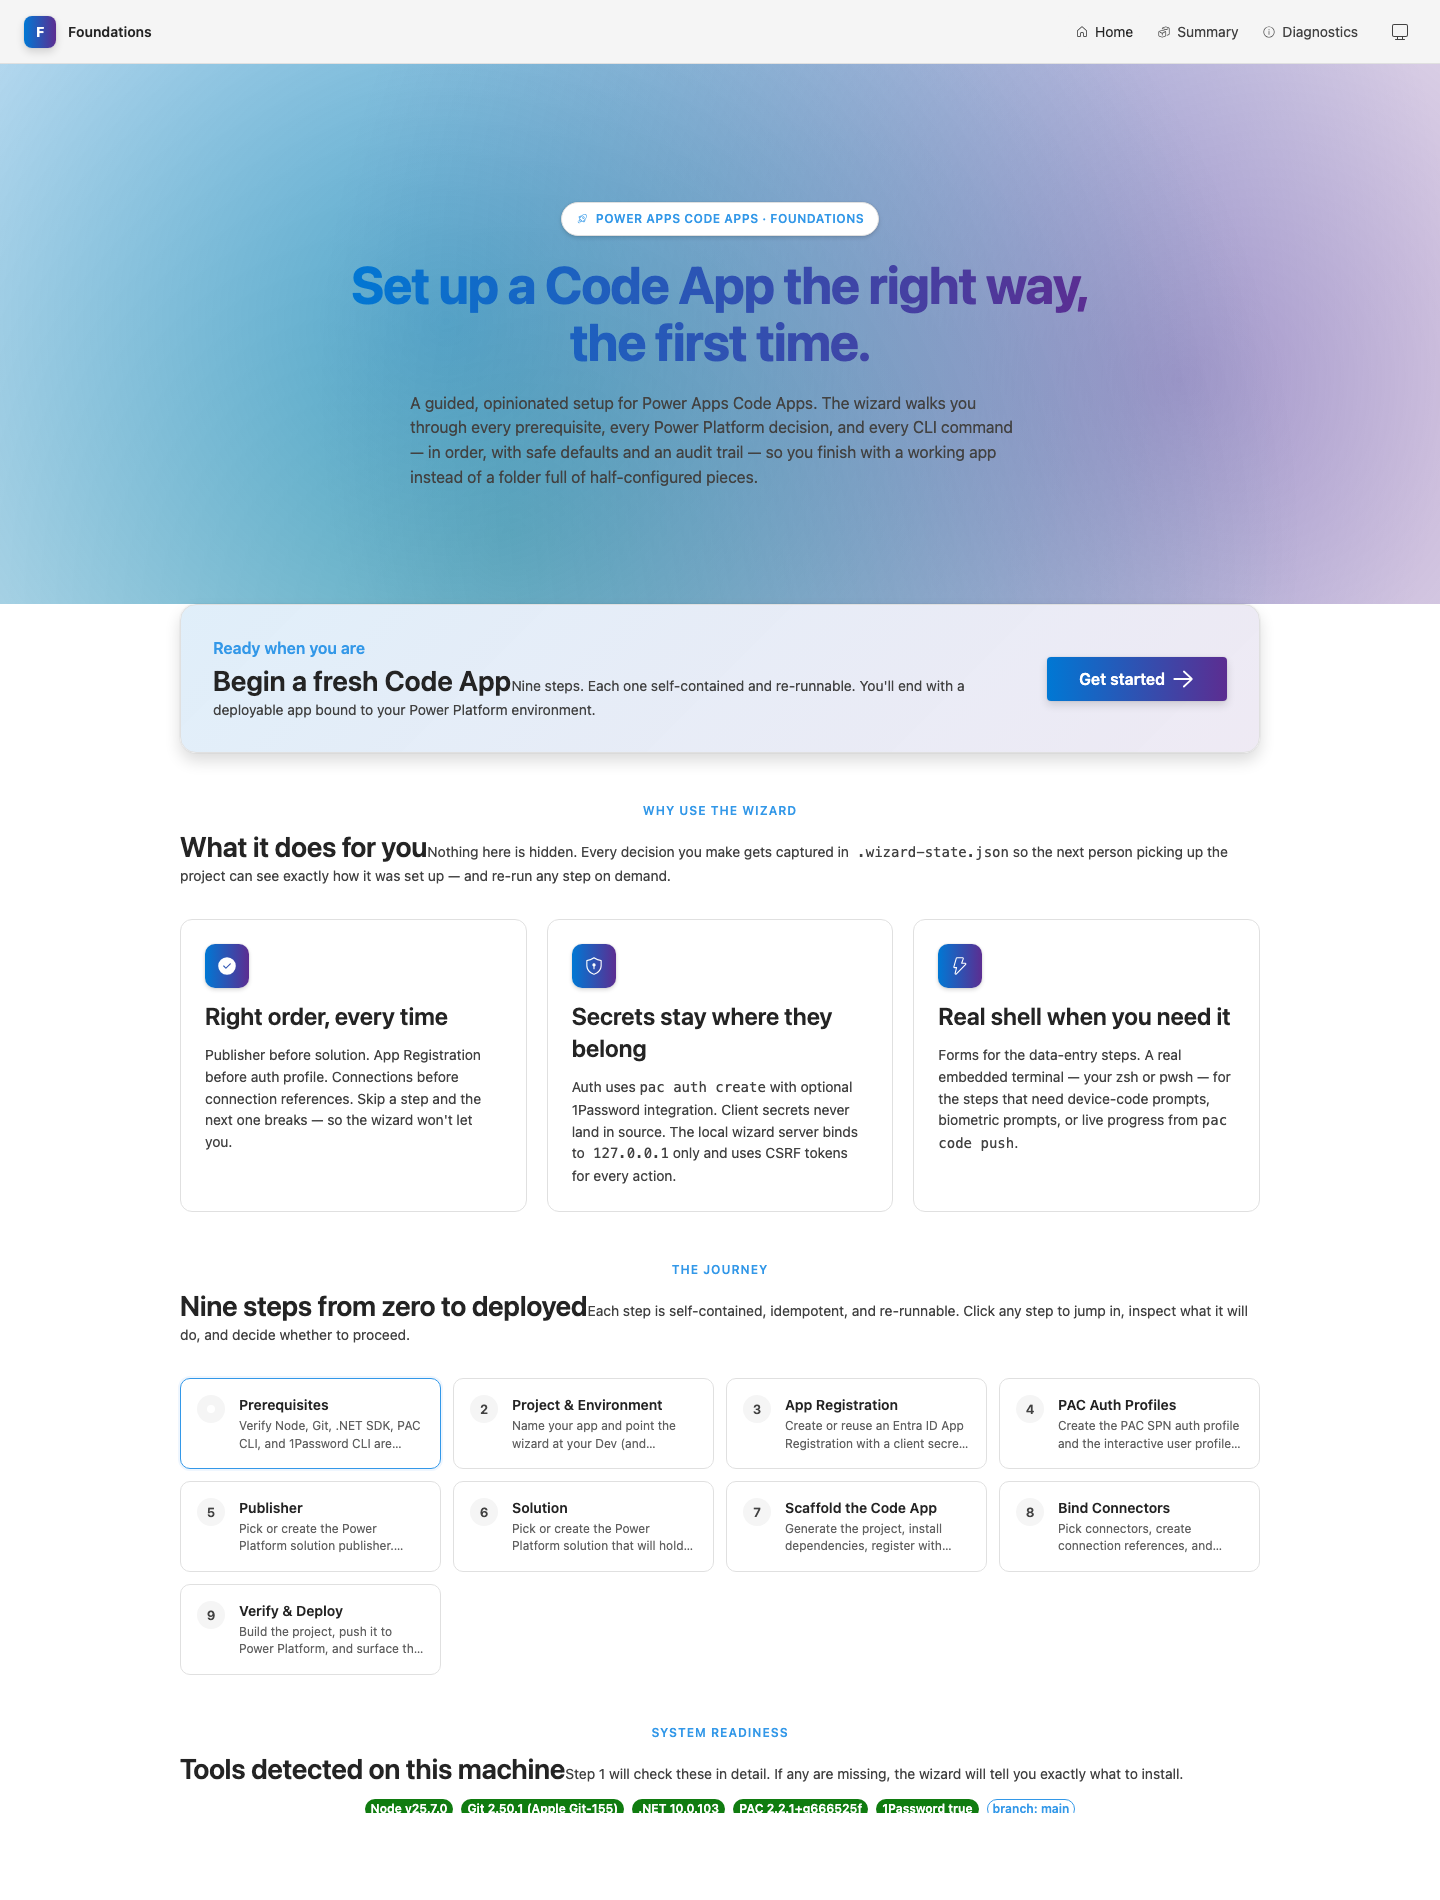
Setup Wizard (Browser)
One npx command, 10 steps. npx @pacaf/wizard-ux@latest opens a Fluent UI browser experience on 127.0.0.1:5174.
Auth & Secrets
1Password integration or .env.local fallback. Client secrets are encrypted at rest with AES-256-GCM. Service Principal auth means no browser popups locally or in CI.
Stay Up to Date
Refresh tooling and synced instruction files with npx pacaf-update. Preview drift with npx pacaf-update --check. Your project code is never touched — only synced foundations files and devDependency versions.
Every coding agent expects its guidance in a different format, but the underlying rules must stay identical. Foundations uses a single canonical source → multiple generated projections model:
- Canonical source —
.github/instructions/*.instructions.md(Copilot-native) plus the hand-authored rootAGENTS.md. - Generated projections — A manifest (
agent-guidance.config.json) maps each canonical file to its Claude (.claude/rules/), Cursor (.cursor/rules/), and Codex (nestedAGENTS.md) equivalents. The@pacaf/agent-instructionspackage ships the canonical files plus all projections. - Sync into your repo —
npx pacaf-instructions syncmaterializes all 16 instruction files plus projections into your derived repo.npx pacaf-updatewraps this together with a refresh of@pacaf/scripts.
In your derived repo: never edit files in .github/instructions/, .claude/rules/, or .cursor/rules/ directly — they will be overwritten by the next sync. Open an issue or PR on the foundations repo instead.
Required Tech Stack
Every Code App uses this exact stack. No substitutions without team lead approval.
| Layer | Choice | Version | Why |
|---|---|---|---|
| Language | TypeScript | 5.x | Type safety across codebase + connector models |
| UI Framework | React | 18.x | Microsoft-recommended; all official samples target React |
| Design System | Fluent UI v9 | @fluentui/react-components | Native Microsoft look; matches Power Platform chrome |
| Bundler | Vite | 5.x | Fast HMR; official templates use Vite |
| Server State | TanStack Query | v5 | Caching, deduplication, background refresh for connectors |
| Routing | React Router | v6 | Nested layouts, data loaders |
| Power Apps SDK | @microsoft/power-apps | ^1.0.3 | Connector access, auth context |
| CLI | PAC CLI | latest (not 2.3.2) | Scaffold, add data sources, deploy |
| Editor | VS Code / Cursor | Latest | Or any editor with coding-agent support |
| Coding Agent | Copilot / Claude / Cursor / Codex | — | Any LLM-backed agent reads the repo's native guidance |
Narrative-First Planning Layer
Use this when the business problem is still being worked out and you want the eventual app to be more than a fast scaffold.
Decompose the Narrative
Your coding agent starts from the user's freeform description, identifies goals, actors, workflows, outputs, constraints, and unknowns, then asks only the most useful follow-up questions.
00a-business-problem-decomposition.instructions.md
Refine the Scope
Your agent challenges for exception paths, validations, approvals, automation, Teams, Microsoft 365 outputs, reporting, governance, and Microsoft Copilot Studio placement decisions.
00b-scope-refinement-and-solution-shaping.instructions.md
Convert to Technical Planning
Once the scope is stable, your agent derives candidate entities, relationships, ownership patterns, and lifecycle states, then hands off into the Dataverse planning artifact workflow.
00c-solution-concept-to-dataverse-plan.instructions.md
Prototype Before Schema
Generate domain contracts and mock providers from the planning payload, build the UX in prototype mode, and capture what that prototype changes in the eventual schema.
00d-prototype-validation.instructions.md
⚠️ Enable Code Apps in Your Environment
This is a prerequisite. Without it, pac code push will fail with "does not allow this operation for this Code app."
pac code push will fail even with correct auth.
Steps
- Open ↗ admin.powerplatform.microsoft.com
- Select your development environment
- Go to Settings → Features
- Find "Code components for canvas apps" → toggle ON
- Find "Allow publishing of canvas apps with code components" → toggle ON
- Click Save
- Wait ~1 minute for the setting to propagate
Auth for pac code push
pac code push requires a user auth profile — the BAP checkAccess API rejects SPN tokens. This is a one-time setup: create a user profile via device-code sign-in, and all subsequent pushes work silently. PAC CLI caches a refresh token that auto-renews (~90 days).
For CI/CD to test/production, use solution export/import instead of pac code push. Solution export and import both accept SPN auth and deploy the Code App, tables, connection references, and security roles as one atomic unit. See the deployment instructions for the full pipeline.
The Setup Wizard
This is the same quick-start flow described in the README. For non-trivial apps, pair it with the planning layer and prototype checkpoint before locking in schema and connectors.
- Click "Use this template" → Create a new repository on GitHub
- Clone your new repo locally and open it in VS Code with a coding-agent extension enabled (GitHub Copilot Chat, Claude Code, Cursor, etc.)
⚠ Do not git clone the template repo directly — that leaves origin pointing to PAppsCAFoundations instead of your own repo.
Step 2 — Ask your agent to run the wizard
In the chat panel, say:
"Set up this Code App using the PACAF wizard."
Your agent will launch this (you can also run it yourself):
Browser wizard — Fluent UI experience at http://127.0.0.1:5174:
npx @pacaf/wizard-ux@latest
Steps that need interactive auth or long-running CLI sessions show a one-click "copy command" handoff in the browser.
Works on Windows, macOS, and Linux. The wizard saves your progress — quit with Ctrl+C and pick up where you left off. Reset with --reset.
Step 3 — Plan before you build
Once the wizard finishes you have a working starter. Don't jump straight to building features. Switch your agent into plan mode and describe the business problem you're solving — your agent will walk through instruction files 00a → 00d before touching schema, connectors, or production code. See Plan Mode with Your Agent below.
Steps 1–2
Check tools, name project & environments
Steps 3–4
App Registration & auth setup
Steps 5–6
Publisher & solution (auto via API)
Steps 7–9
Scaffold, bind connectors, build & deploy
Step 10
Install Dataverse-skills plugin for your agent
All 10 Wizard Steps
Expand each step to see what happens and what you'll need.
The wizard checks for required tools and offers to install missing ones:
- Editor — VS Code (Install), Cursor, or any editor with coding-agent support
- Coding Agent — GitHub Copilot, Claude Code, Cursor, Codex, or another LLM-backed agent (see below)
- Node.js 20+ — Install
- Git — Install
- .NET SDK — Install
- PAC CLI — The wizard will install it automatically via
dotnet tool install -g Microsoft.PowerApps.CLI.Toolif missing - 1Password CLI (optional) — Install
pac code push. The wizard detects this and helps you downgrade.The wizard prompts you for your app name and environment URLs:
| Value | Example | Notes |
|---|---|---|
| App name | My Brain | Display name, any characters |
| Dev environment URL | https://org-dev.crm.dynamics.com | Required. Must have Dataverse enabled. |
| Test environment URL | https://org-test.crm.dynamics.com | Optional — press Enter to skip |
| Prod environment URL | https://org.crm.dynamics.com | Optional — press Enter to skip |
If you don't have a development environment yet, create one first:
- Open ↗ admin.powerplatform.microsoft.com → Environments → + New
- Name it Your App - Dev, type Developer or Sandbox
- Toggle "Add Dataverse" to YES (required!)
- Copy the Environment URL after provisioning
This step collects your Azure App Registration credentials. If you use 1Password, the wizard detects it and tries to pull credentials automatically.
1Password Users (fastest path)
If the op CLI is detected, the wizard asks for your vault and item name, then reads tenant-id, app-id, and client-secret directly from 1Password. If all three are found, you skip all manual entry.
tenant-id(Text) — your Azure Directory IDapp-id(Text) — your App Registration Client IDclient-secret(Password) — your App Registration secretenv-dev(Text) — your Dev environment URLenv-test(Text, optional) — Test environment URLenv-prod(Text, optional) — Prod environment URL
If the item doesn't exist yet, the wizard will collect values manually and offer to create the 1Password item for you.
Manual Path (no 1Password, or partial credentials)
If 1Password isn't available, or some fields are missing, the wizard guides you through creating the App Registration:
A. Create Azure App Registration
- Open ↗ Azure Portal — App registrations
- Click + New registration
- Name:
PowerApps-CodeApps-YourApp, Single tenant - Copy Application (client) ID and Directory (tenant) ID
- Go to Certificates & secrets → + New client secret
- Copy the secret value immediately — shown only once!
- Go to API permissions → + Add → Dataverse → user_impersonation
- Click Grant admin consent
B. Register as Application User
- Open ↗ admin.powerplatform.microsoft.com
- Select environment → Settings → Users + permissions → Application users
- + New app user → search for your App Registration → assign System Administrator role
The wizard takes the credentials from Step 3 and handles everything:
- If you chose 1Password in Step 3, the storage mode and vault/item are already set — no repeated questions
- Otherwise, choose 1Password or .env.local for secret storage
- Writes credential files (
op://references or encrypted values) - Ensures
.env.localis in.gitignore - Creates repo-scoped PAC auth profiles for each environment instead of machine-global
Dev/Test/Prodnames - Runs
pac org whoto verify the selected profile matches the wizard target environment and should show your App Registration name, not a human user - Installs a pre-commit hook to prevent accidental secret leaks
pac commands work without any browser popup. SPN auth is used for Dataverse API calls, publisher/solution creation, and CI/CD (solution export/import). pac code commands (push, add-data-source) need a user profile — created once via the wizard (one-time sign-in, then silent). The wizard handles this automatically in the later connected-mode steps.The wizard queries Dataverse directly to find existing publishers or create a new one — no Maker Portal visit needed.
- Lists all existing publishers in the environment via Dataverse Web API
- Lets you select an existing publisher or create a new one
- If creating new: prompts for prefix, display name, and internal name
- Creates the publisher via API with all required properties
- Records the Choice value prefix automatically
| Value | Example | Rules |
|---|---|---|
| Publisher prefix | mybrn | 2–8 lowercase letters only. Cannot change later. |
| Publisher display name | My Brain Engineering | Human-readable |
| Publisher internal name | mybrainengineering | Lowercase, no spaces |
Like the publisher step, the wizard creates or selects a solution via Dataverse Web API — no Maker Portal visit needed.
- Lists all existing unmanaged solutions in the environment
- Lets you select an existing solution or create a new one
- If creating new: prompts for display name and unique name
- Creates the solution via API, bound to your publisher from Step 5
| Value | Example | Notes |
|---|---|---|
| Solution display name | My Brain | Shown in the Maker Portal solution list |
| Solution unique name | MyBrain | No spaces. Used in CLI commands and API calls. |
The wizard creates a complete, ready-to-develop project:
- Downloads the official starter template (or creates a minimal fallback)
- Installs all dependencies (React, Fluent UI v9, TanStack Query,
@microsoft/power-apps) - Writes
tsconfig.jsonwithmoduleResolution: "bundler" - Writes
vite.config.tswith port 3000,@/path alias, and relative base path for deploy - Creates the full folder structure (components, pages, hooks, utils, tests, etc.)
- Writes starter files:
main.tsx,App.tsxwith Fluent UI + TanStack Query providers - Writes
vitest.config.tswith jsdom, jest-dom matchers,@/alias, and coverage thresholds - Creates smoke test infrastructure:
tests/setup/setup.ts,tests/setup/test-utils.tsx(custom render with all providers), andsrc/App.test.tsx - Runs
npm run test:smokeautomatically to verify the scaffold is healthy before proceeding - Copies all instruction files and agent-native guidance (
.claude/rules/,.cursor/rules/, nestedAGENTS.md) from the foundations repo - Includes the narrative-first planning instructions so you can refine the business scope before hardening schema and connector choices
- Seeds prototype contracts, mock providers, and
dataverse/prototype-feedback.mdfrom the planning payload - Runs
pac code initto register the app in Power Platform - Defers connector setup by default so the team can prototype before binding real systems
- Initializes Git repo, detects or prompts for remote URL, makes initial commit
- Generates a project-specific README (replaces the template README)
vitest.config.ts, a test setup with provider wrappers, and src/App.test.tsx with three smoke tests. The wizard runs npm run test:smoke automatically during this step — if they pass, your scaffold is verified healthy. You can re-run anytime with npm run test:smoke or npm run test.
Connector & Data Source Setup
The initial scaffold no longer asks for connector IDs up front. The intended flow is to return later once the planning payload and prototype are stable enough to bind real systems.
# Browser wizard — navigate to Step 8 (Bind Connectors):
npx @pacaf/wizard-ux@latest
pac code commands need a user auth profile (not SPN). The wizard detects SPN auth and automatically switches to a user profile before running pac code add-data-source. This user profile only needs to be created once — subsequent calls work silently.
When you do re-run connector setup, the wizard first tries pac connection list, filters to the selected connector API ID, and lets you choose from discovered connections. Manual Connection ID entry is only the fallback.
How to Get Connection IDs
You must create connections before adding them as data sources. See the Creating Connections section below for step-by-step instructions. Once they exist, the later wizard connector flow can often discover them for you.
This is the first connected-mode step. Run it only after the planning payload and prototype are stable enough that connector choices are no longer guesses.
- Presents a checklist of the seven most common connectors (Office 365 Users, SharePoint, Dataverse, SQL, Teams, Blob, Outlook)
- Then loops on "Add another connector by URL or apiId (blank to finish)" — paste any Maker Portal connection URL or a bare
shared_xxxapiId, including custom connectors and connectors not on the shortlist - Creates solution-level connection references for the connectors you actually chose
- Runs
pac connection listand filters matches to the selected connector API ID - Lets you select an existing connection when matches are found
- Falls back to manual Connection ID entry only when discovery does not find a usable match
- Adds the selected data sources to the Code App so generated services can be produced later
.../connections/shared_office365users/<GUID>/details and the wizard extracts both
the connector apiId and the connection GUID in one shot — no separate Connection-ID prompt for that connector.
Pasting just a bare GUID still works, and bare apiIds (e.g. shared_approvals) skip the URL entirely
and go straight to connection-ID resolution. Environment URLs are similarly tolerant — paste straight from PPAC,
with or without https://.
pac code add-data-source. The wizard switches from SPN automatically when needed. If the profile already exists, no sign-in is required.The wizard runs:
npm run build— verifiesdist/index.htmlexists- Checks
power.config.jsonforappIdto determine first vs. subsequent push - First push: Creates a user auth profile via browser sign-in (one-time)
- Subsequent pushes: Work silently — the cached refresh token auto-renews (~90 days)
- Offers to deploy through the verified PAC flow instead of trusting the active machine profile
Then displays a complete summary of everything that was set up and what to do next:
cd ../your-app
npm run dev:local    ← prototype with mock providers
npm run prototype:seed ← refresh prototype assets after editing the planning payload
npm run dev          ← connected mode once real providers exist
npx @pacaf/wizard-ux@latest --from 8 ← bind real connectors when ready
npm run deploy       ← deploy changes after the app has been registered
The final wizard step prepares your coding agent for the heavy Dataverse work that lies ahead. The Dataverse-skills plugin teaches your agent to provision Dataverse schema, import data, manage solutions, and administer environments through the MCP server, Python SDK, and PAC CLI — replacing hand-written bash/curl scripts with tested, idempotent, agent-native operations.
The wizard:
- Detects which coding agent you're using (Copilot, Claude Code, Cursor, or Codex)
- Shows the install command appropriate for that agent
- Reminds you to install Python 3 and the PowerPlatform-Dataverse-Client SDK (
pip install PowerPlatform-Dataverse-Client pandas) if not already present
- GitHub Copilot:
/plugin install dataverse@awesome-copilot - Claude Code:
/plugin install dataverse@claude-plugins-official - Cursor / Other: See the Dataverse-skills README for manual MCP configuration
After installation, prompt your agent with "Connect to Dataverse" — the dv-connect skill walks through tool checks, authentication, and MCP server registration. When it finishes, pac auth list shows your active environment and your agent can drive Dataverse-skills tasks for schema, data, queries, solutions, and admin operations.
🧠 Plan Mode with Your Coding Agent
After the wizard finishes, don't jump to "add a table and a page." Switch your agent into plan mode and let it walk through the planning instruction files 00a → 00d before any schema or production code is written.
How to enter plan mode
| Coding agent | How to enter plan mode |
|---|---|
| GitHub Copilot Chat | In the chat panel, switch the mode dropdown from Ask / Edit to Agent, then prefix your first message with [[PLAN]] |
| Claude Code | Toggle Plan mode with ⌘+Shift+P → Claude: Toggle Plan Mode, or start your message with /plan |
| Cursor | Use Composer → Plan before Apply |
| Other agents | Tell it explicitly: "Stay in plan mode. Don't write code yet." |
What to say first
Describe what you want to build in business terms, not technical ones:
"I want to manage equipment loans across our field offices. Multiple regions, approvers, and an audit trail when assets go missing. Help me plan this out properly before we touch any code or schema."
What the planning workflow produces
Decompose the narrative
Your agent identifies goals, actors, workflows, outputs, constraints, and unknowns from your description, then asks only the most useful follow-up questions.
00a-business-problem-decomposition.instructions.md
Refine the scope
Your agent challenges for exception paths, validations, approvals, automation, Teams, M365 outputs, reporting, governance, and Copilot Studio placement.
00b-scope-refinement-and-solution-shaping.instructions.md
Convert to a technical plan
Once scope is stable, your agent derives candidate entities, relationships, ownership patterns, and lifecycle states, then writes a dataverse/planning-payload.json that drives schema provisioning through the Dataverse-skills plugin.
00c-solution-concept-to-dataverse-plan.instructions.md
Prototype before schema
Your agent generates domain contracts and mock providers from the planning payload, builds the UX in prototype mode, and captures what that prototype changes in the eventual schema.
00d-prototype-validation.instructions.md
When you're happy, exit plan mode and build
Switch your agent out of plan mode and say:
"Looks good. Provision the Dataverse schema, generate the connectors, and deploy to my dev environment."
Your agent will then drive schema provisioning (often via the Dataverse-skills plugin), rerun the wizard's connector-binding step, and run pnpm build + pac code push.
⚙️ pacaf-* CLIs
All helper scripts ship in the @pacaf/scripts package and are invokable via npx. Your derived repo adds them as a devDependency so your package.json scripts can use the bare pacaf-* names.
| CLI | Purpose |
|---|---|
pacaf-update | Refresh @pacaf/scripts + @pacaf/agent-instructions and re-sync instruction files |
pacaf-instructions | sync / check / list agent-guidance projections |
pacaf-migrate-thin | Convert an older derived repo with in-tree tooling to consume @pacaf/* packages |
pacaf-seed | Seed prototype assets (mock providers, hooks, components, feedback artifact) |
pacaf-discover-connection | Discover existing Power Platform connections by API ID |
pacaf-pac / pacaf-pac-safe | Wrappers around pac with retry + error normalization |
pacaf-setup-auth | Idempotent PAC auth profile bootstrap (1Password or .env.local) |
pacaf-patch-datasources | Patch power.config.json data source info after edits |
pacaf-detect-agent | Detect which coding agent is in use (Copilot / Claude / Cursor / Codex) |
pacaf-generate-agent-guidance | Regenerate Claude/Cursor/Codex projections from the canonical instructions |
pacaf-decrypt-secret | Decrypt a secret encrypted by the wizard's AES-256-GCM flow |
pacaf-rebrand | (Forks only) Retarget a fork to your own scope and bin prefix |
- In a fresh repo before installing:
npx pacaf-update - In a project that already has
@pacaf/scriptsas a devDep:pnpm exec pacaf-updateornpm run updateif scripts are wired - For the wizard specifically:
npx @pacaf/wizard-ux@latest
Creating Connections
Before moving from prototype mode into connected mode, create the actual connection instances in the Maker Portal.
A connection reference (created by the wizard in your solution) is a pointer that says "this app uses the Office 365 Users connector." The connection is the authenticated instance — the actual credential that makes it work. You need both.
Step-by-Step: Create a Connection
- Go to ↗ make.powerapps.com and select your development environment
- In the left nav, click Connections (under Data, or directly at
make.powerapps.com/environments/<env-id>/connections) - Click + New connection
- Search for the connector (e.g. Office 365 Users) and click it
- Click Create and authenticate when prompted
- Once created, click the connection to open its details
- Copy the Connection ID from the browser URL — it's the GUID at the end:
https://make.powerapps.com/environments/xxx/connections/shared_office365users/160ffdfd-aff5-4740-86a8-47209c1c608c/details
Common Connectors
| Connector | API ID (for pac CLI) |
|---|---|
| Dataverse | dataverse (uses -t <table> instead of -c) |
| Office 365 Users | shared_office365users |
| SharePoint | shared_sharepointonline |
| Office 365 Outlook | shared_office365 |
| Microsoft Teams | shared_teams |
| SQL Server | shared_sql |
| Azure Blob Storage | shared_azureblob |
Adding Data Sources (After Getting Connection IDs)
Preferred path: rerun the wizard when you are ready to connect real data.
# Browser wizard — navigate to Step 8:
npx @pacaf/wizard-ux@latest
The wizard will create the solution-level connection references, try to discover existing environment connections with pac connection list, and let you select one when matches are found.
# Dataverse tables (no connection ID needed):
pac code add-data-source -a dataverse -t myprefix_project

# Non-Dataverse connectors (connection ID required):
pac code add-data-source -a shared_office365users -c 160ffdfd-aff5-4740-86a8-47209c1c608c
pac code add-data-source -a shared_sharepointonline -c <YOUR_CONNECTION_ID>
pac code commands). Create one once — it works silently after that:
pac auth create --name pp-myrepo-d-u-1a2b3c4d --environment https://org-dev.crm.dynamics.com --deviceCode
pac auth select --name pp-myrepo-d-u-1a2b3c4d
Portal Quick Links
Portals you may need during setup (Step 3 App Registration is the main manual step).
Power Apps Maker Portal
View your solution, tables, and connections. Publishers and solutions are created automatically by the wizard.
Power Platform Admin Center
Create environments, register Application Users, manage settings.
Azure Portal — App Registrations
Create Service Principal, client secrets, API permissions.
Azure Portal — Entra ID
Manage tenant, users, enterprise applications, admin consent.
Local Development with Vite
Two modes: Prototype (mock providers, no Power Platform) and Connected (real connectors). Always start with Prototype mode.
Prototype Mode
Vite only. Domain contracts plus mock providers. No auth, no connections, no Power Platform needed. Build UI fast and let the UX challenge the data model.
npm run dev:local
Connected Mode
Vite + pac code run. Real connector calls through the Power Platform proxy.
npm run dev
When to Use Each Mode
| Phase | Command | What Runs | Data Source |
|---|---|---|---|
| Prototyping / UI | npm run dev:local | Vite only | Mock data |
| Refresh prototype assets | npm run prototype:seed | Node script | Planning payload |
| Integration | npm run dev | Vite + pac code run | Real connectors |
| Unit Tests | npm run test | Vitest | Mock data (MSW) |
| E2E Tests | npm run test:e2e | Vite + Playwright | Mock data |
| Production Build | npm run build | tsc + Vite build | N/A (static) |
| Deploy | npm run deploy | Build + pac code push | N/A |
Prototype Mode — How It Works
npm run dev:local runs VITE_USE_MOCK=true vite --port 3000. Vite serves your app at http://localhost:3000 with sub-second HMR — save a file, see it instantly. Refresh prototype contracts and mock providers anytime with npm run prototype:seed after editing dataverse/planning-payload.json.
PowerProvider context, auth context, connection consent — these require pac code run.Need the full sequence from planning payload through prototype review to real providers? Open the prototype-first golden path.
Mock Data Pattern
Every hook that calls a connector checks VITE_USE_MOCK to decide whether to return mock data or make a real call:
// src/hooks/useProjects.ts
import { useQuery } from '@tanstack/react-query';
import { mockProjects } from '@/mockData/projects';
import { ProjectService } from '@/generated/services/ProjectService';

const USE_MOCK = import.meta.env.DEV && import.meta.env.VITE_USE_MOCK === 'true';

export function useProjects() {
  return useQuery({
    queryKey: ['projects'],
    queryFn: USE_MOCK
      ? () => Promise.resolve({ data: mockProjects })
      : () => ProjectService.getAll(),
  });
}
Connected Mode — Prerequisites
- PAC auth profiles created (
pac org whoshows org, no popup) - Data source added:
pac code add-data-source - At least one data source added with
pac code add-data-sourcesosrc/generated/exists power.config.jsonexists next topackage.json
Vite Configuration
// vite.config.ts
import { defineConfig } from 'vite';
import react from '@vitejs/plugin-react';
import path from 'path';

export default defineConfig(({ command }) => ({
  base: command === 'build' ? './' : '/', // CRITICAL for Code Apps
  plugins: [react()],
  server: {
    port: 3000,          // Required by Power Apps SDK
    strictPort: true,    // Fail if 3000 occupied (don't silently use 3001)
    open: true,          // Auto-open browser
  },
  resolve: {
    alias: { '@': path.resolve(__dirname, './src') },
  },
  build: { outDir: 'dist' },
}));
base: './' is required for production builds. Power Apps serves your bundle from a nested, non-root path. Without relative base, all asset URLs are absolute (/assets/index-abc.js) which 404 → blank screen.
Vite Environment Variables
Only variables prefixed with VITE_ are exposed to client code via import.meta.env. This is a security feature — Power Platform credentials (PP_*) are never leaked to the browser.
| Variable | Purpose | Set In |
|---|---|---|
VITE_USE_MOCK | Toggle mock data | dev:local script or .env.development |
VITE_APP_TITLE | App display name (optional) | .env or .env.development |
Troubleshooting
| Problem | Fix |
|---|---|
| Port 3000 already in use | lsof -ti:3000 | xargs kill -9 |
pac code run fails | Check pac org who, avoid PAC v2.3.2, confirm power.config.json |
| HMR not refreshing | Verify react() plugin in vite.config.ts, clear cache: rm -rf node_modules/.vite |
| Mock data shape mismatch | Re-run pac code add-data-source for the affected table or connector, then compare with src/generated/models/ |
See .github/instructions/01-scaffold.instructions.md for complete Vite config, mock data patterns, and mutation mocking.
Connectors
Code Apps cannot make direct HTTP calls. All data access goes through Power Platform connectors, but connector binding should happen after prototype validation.
connect-src 'none'. If a connector exists for the service, use it — no exceptions.Adding a Data Source
Recommended order: prototype first, then rerun the wizard from the dedicated connector step once the planning payload is stable.
# Browser wizard — navigate to Step 8:
npx @pacaf/wizard-ux@latest
# Dataverse (no connection ID needed):
pac code add-data-source -a dataverse -t myprefix_project

# Non-Dataverse connectors (connection ID required — see Creating Connections):
pac code add-data-source -a shared_office365users -c <CONNECTION_ID>
pac code commands need a user auth profile (not SPN). Create the profile once, then all subsequent calls work silently. Switch to your repo-scoped user profile for the current environment before running them.Wrapping Generated Code with TanStack Query
// src/hooks/useProjects.ts
import { useQuery } from '@tanstack/react-query';
import { SqlService } from '@/generated/services/SqlService';

export function useProjects() {
  return useQuery({
    queryKey: ['projects'],
    queryFn: () => SqlService.getProjects(),
    staleTime: 5 * 60 * 1000,  // Connector calls aren't free
  });
}
src/generated/. They're auto-generated by the PAC CLI. If you need to extend a type, create a wrapper in src/types/.See .github/instructions/02-connectors.instructions.md for full patterns including Dataverse OData queries, pagination, and error handling.
Components
React + Fluent UI v9 patterns for consistent, accessible UI.
Key Principles
- Functional components only (no class components)
- Single responsibility — files under ~150 lines
- Fluent UI v9 (
@fluentui/react-components) for all controls - Style with
makeStyles+ design tokens — never raw CSS values - Local state (
useState) for UI; Server state (TanStack Query) for data - Colocate tests:
ProjectCard/ProjectCard.tsx+ProjectCard.test.tsx
Provider Stack (main.tsx)
<QueryClientProvider>
  <FluentProvider theme={webLightTheme}>
    <BrowserRouter>
      <App />
    </BrowserRouter>
  </FluentProvider>
</QueryClientProvider>
See .github/instructions/03-components.instructions.md for layout patterns, data tables, error boundaries, and accessibility guidance.
Deployment & CI/CD
From local dev to production with GitHub Actions.
Flow
Feature Branch → PR → CI (lint + test + build) → Merge → Deploy to Dev
                                                              ↓
                                          Deploy to Test → Deploy to Prod
Manual Deploy (Dev Only)
pac code push is rejected with SPN auth for both first and subsequent pushes. The wizard creates a user profile automatically. For CI/CD, see Enable Code Apps and the deployment instructions for workarounds.npm run deploy
GitHub Secrets Required
| Secret | Description |
|---|---|
PP_APP_ID | Application (client) ID |
PP_CLIENT_SECRET | Client secret value |
PP_TENANT_ID | Directory (tenant) ID |
Per-Environment Variable
| Variable | Description |
|---|---|
POWER_PLATFORM_URL | Environment URL (e.g. https://org-dev.crm.dynamics.com) |
See .github/instructions/04-deployment.instructions.md for CI/CD workflow YAML, solution management, and deployment settings files.
Testing
Vitest for units, Playwright for E2E, MSW for connector mocking.
What to Test
- ✅ Component rendering with different states
- ✅ User interactions (clicks, form submissions)
- ✅ Custom hooks wrapping connectors
- ✅ Utility functions with business logic
- ❌ Generated files (
src/generated/) - ❌ Fluent UI internals
See .github/instructions/05-testing.instructions.md for config files, MSW handler patterns, and CI integration.
Security
Auth is automatic. Your job: don't leak secrets, validate inputs, sanitize output.
.env.local.Required .gitignore Entries
.env.local
.env.*.local
.pac/
auth.json
node_modules/
dist/
coverage/
.wizard-state.json
Input Validation
// Always validate user inputs
if (/<script/i.test(name)) return 'Invalid characters';
if (name.length > 200) return 'Max 200 characters';

// Never use dangerouslySetInnerHTML with user data
<Text>{project.description}</Text>  // Safe — React escapes
See .github/instructions/06-security.instructions.md for error message guidelines, DLP handling, and code review checklist.
Dataverse Schema
Tables, columns, option sets — and the rules that prevent expensive mistakes.
Golden Rules
- Always global option sets — never inline choices
- Always use publisher prefix —
mybrn_ideastatus, notideastatus - Option values start at 100000000 — never 0 or 1
- Add, don't delete — removing a live option value breaks existing records silently
- Create inside the solution — never from the top-level Tables view
Naming Convention
✅  mybrn_ideastatus          (prefix + descriptive, all lowercase)
✅  mybrn_complexitylevel
❌  IdeaStatus                (no prefix — collides)
❌  mybrn_IdeaStatus          (camelCase — use all lowercase)
See .github/instructions/07-dataverse-schema.instructions.md for column creation patterns, relationship modeling, and the complete provisioning sequence.
🔌 Dataverse-skills Plugin
Strategic alignment with microsoft/Dataverse-skills — the best-practice mechanism for agent-driven Dataverse operations.
Why a plugin instead of built-in scripts?
Foundations is a Code App template — it owns the planning workflow, scaffold, connector adapters, and form field patterns. Dataverse environment operations (schema provisioning, data seeding, solution lifecycle, admin tasks) are better served by a dedicated, community-maintained plugin that evolves with the Dataverse SDK and MCP server.
Scope Split
| Responsibility | Owner |
|---|---|
| Schema provisioning (tables, columns, relationships, option sets) | Dataverse-skills plugin (dv-metadata) |
| Data operations (CRUD, bulk import, sample data) | Dataverse-skills plugin (dv-data, dv-query) |
| Solution lifecycle (export, import, deploy) | Dataverse-skills plugin (dv-solution) |
| Environment admin (bulk delete, settings, roles) | Dataverse-skills plugin (dv-admin, dv-security) |
| Business planning workflow (00a → 00d) | This repo |
| Code App scaffold, Fluent UI, Vite | This repo |
Connector adapter pattern & pac code add-data-source | This repo |
Form field metadata pattern (DataverseFieldLabel) | This repo |
Install
The wizard (Step 10) detects your coding agent and shows the correct command:
GitHub Copilot:  /plugin install dataverse@awesome-copilot
Claude Code:     /plugin install dataverse@claude-plugins-official
Prerequisites: python3 + pip install PowerPlatform-Dataverse-Client pandas
How It Flows Together
- Plan the business problem (00a → 00c) →
dataverse/planning-payload.json - Discover existing schema first → agent uses
list_tables/describe_tablefrom the plugin - Provision schema → agent uses
dv-metadatafrom the plugin - Register data sources →
pac code add-data-sourcegenerates TypeScript SDK - Build the UI with generated services, Fluent UI, TanStack Query
Copilot Studio Agent Integration
Add a conversational AI agent to your Code App using the Microsoft Copilot Studio connector.
CopilotStudioService handles everything.Setup Steps
- Create & publish your agent in ↗ Copilot Studio
- Get the agent name from Channels → Web app → connection string (e.g.
cr3e1_customerSupportAgent) - Create a connection in make.powerapps.com → Connections → + New → "Microsoft Copilot Studio"
- Add the data source:
pac code add-data-source -a "shared_microsoftcopilotstudio" -c <connectionId>
- Import & call the generated service in your React code
Invoking the Agent
ExecuteCopilotAsyncV2. The other methods (ExecuteCopilot, ExecuteCopilotAsync) have known issues — fire-and-forget or 502 errors.import { CopilotStudioService } from '@/generated/services/CopilotStudioService';
const response = await CopilotStudioService.ExecuteCopilotAsyncV2({
message: "What is the status of my order?",
notificationUrl: "https://notificationurlplaceholder",
agentName: "cr3e1_customerSupportAgent",
});
if (response.data.completed) {
console.log(response.data.lastResponse);
}
Request Parameters
| Parameter | Required | Description |
|---|---|---|
message | Yes | User's message. Can be JSON string for structured data. |
notificationUrl | Yes | Always "https://notificationurlplaceholder" |
agentName | Yes | Published agent name (case-sensitive, includes publisher prefix) |
Response Structure
| Property | Type | Description |
|---|---|---|
responses | string[] | Array of response strings from the agent |
conversationId | string | Conversation ID for multi-turn tracking |
lastResponse | string | Most recent agent response |
completed | boolean | Whether the agent finished processing |
conversationId, ConversationId, or conversationID. Always use optional chaining or a safe accessor.Prototype Mode (Mock Data)
When running npm run dev:local, create a mock that simulates agent responses with realistic delays. The instruction file includes a complete mock implementation and shows how to wire it into useCopilotAgent with the VITE_USE_MOCK toggle.
See .github/instructions/08-copilot-studio.instructions.md for the complete hook, chat UI component, structured I/O patterns, and troubleshooting.
Naming Conventions
Quick reference for file, component, and Dataverse naming.
| Type | Convention | Example |
|---|---|---|
| Components | PascalCase folder + file | components/ProjectCard/ProjectCard.tsx |
| Hooks | camelCase + use prefix | hooks/useProjects.ts |
| Utils | camelCase | utils/formatDate.ts |
| Types | PascalCase | types/ProjectExtended.ts |
| Constants | SCREAMING_SNAKE in file | constants/routes.ts |
| Tests | Same name + .test | ProjectCard.test.tsx |
| Dataverse tables | prefix_tablename | mybrn_project |
| Option sets | prefix_descriptivename | mybrn_ideastatus |
Common Connector IDs
Use these when creating deployment settings files or connection references.
| Connector | Internal Name | ConnectorId |
|---|---|---|
| Office 365 Users | shared_office365users | /providers/Microsoft.PowerApps/apis/shared_office365users |
| Office 365 Outlook | shared_office365 | /providers/Microsoft.PowerApps/apis/shared_office365 |
| SharePoint | shared_sharepointonline | /providers/Microsoft.PowerApps/apis/shared_sharepointonline |
| Microsoft Dataverse | shared_commondataserviceforapps | /providers/Microsoft.PowerApps/apis/shared_commondataserviceforapps |
| SQL Server | shared_sql | /providers/Microsoft.PowerApps/apis/shared_sql |
| Microsoft Teams | shared_teams | /providers/Microsoft.PowerApps/apis/shared_teams |
| Azure Blob Storage | shared_azureblob | /providers/Microsoft.PowerApps/apis/shared_azureblob |
| HTTP with Entra ID | shared_webcontents | /providers/Microsoft.PowerApps/apis/shared_webcontents |
To find Connection IDs in the Power Apps Maker Portal, look at the URL after creating a connection:
https://make.powerapps.com/environments/xxx/connections/shared_office365users/CONNECTION_ID/details
What's Next
After the wizard finishes, here's your daily workflow and common commands.
Daily Development
| Command | What It Does |
|---|---|
npm run dev:local | Prototype with mock data — no auth or Power Platform connection needed |
npm run dev | Connected mode — runs Vite + pac code run concurrently |
npm run build | TypeScript check + Vite production build → dist/ |
npm run test | Run unit tests with Vitest |
npm run lint | ESLint check across src/ |
Deploying
| Command | What It Does |
|---|---|
pac code push | Upload your built app to Power Platform |
npm run deploy | Shortcut: build + push in one command |
pac code push requires Power Platform API access that service principal (SPN) auth lacks for first-push and pac code mutation flows. Use the repo-scoped interactive profile for that environment, then push:
pac auth create --name pp-myrepo-d-u-1a2b3c4d --environment <your-env-url> --deviceCode
pac auth select --name pp-myrepo-d-u-1a2b3c4d
pac code push
Connectors & Connection References
The wizard auto-creates connection references in your solution so they travel across environments. This happens in an explicit later connector-binding pass, not during the initial scaffold.
| Action | How |
|---|---|
| Add connectors via wizard | npx @pacaf/wizard-ux@latest → Step 8 |
| Add Dataverse table manually | pac code add-data-source -a dataverse -t <table_name> |
| Add other connector manually | pac code add-data-source -a <api_id> -c <conn_id> |
| Map references after import | Power Apps Maker Portal → Solutions → Connection References |
--apiId (-a) is always required for manual adds — there is no interactive picker in the CLI. The wizard compensates for this by discovering existing environment connections with pac connection list and letting you select one when possible. See the Connector IDs table above for common API IDs.
Re-running the Wizard
The wizard stores progress in .wizard-state.json and lets you jump directly to any step from the step navigator.
| Command | What It Does |
|---|---|
npx @pacaf/wizard-ux@latest | Open the browser wizard — resume, or jump to any step from the step navigator |
npx @pacaf/wizard-ux@latest --from 7 | Re-run from the scaffold step onward (including connector binding and deploy) |
npx @pacaf/wizard-ux@latest --from 8 | Run the dedicated connector-binding pass and select real connections |
npx @pacaf/wizard-ux@latest --reset | Start completely fresh |
Keeping Foundations Up to Date
When new @pacaf/* versions ship, refresh tooling and synced instruction files in your derived repo:
| Command | What It Does |
|---|---|
npx pacaf-update | Bump @pacaf/scripts + @pacaf/agent-instructions and re-sync instruction files into .github/instructions/, .claude/rules/, .cursor/rules/, etc. |
npx pacaf-update --check | Preview drift only — show what would change without writing |
npx pacaf-instructions sync | Re-sync only the instruction files (skip dependency bumps) |
Your application code is never touched. Only synced foundations files and the two devDependency versions in your package.json change.
Setting Up CI/CD
See .github/instructions/04-deployment.instructions.md for full details. You'll need:
- GitHub secrets:
PP_APP_ID,PP_CLIENT_SECRET,PP_TENANT_ID - Environment variable per target:
POWER_PLATFORM_URL